Sunday 23 December 2012

Using Foam Board to Make Model Buildings

Foam board, for those who do not know, is made from a piece of polystyrene with card attached to the flat sides. It can be drawn on like any other piece of card and cut with a simple craft knife. The material does have its limitations, such a requiring a water based adhesive such as PVA glue, but as modelling materials go it is versatile.

I decided to try out some prototyping for a village typical of one in Europe in the 1940's to suit the 'Bolt Action' battle reports that we will be filming in the new year on my YouTube channel 'wargamingforfun'. 

Many village churches, especially in England and Wales, have a similar look to them and it was the look of the local church that I decided to base the idea on. I have simplified the design but I feel it is true to the original.


Using a piece of MDF measuring around 12' x 18' I cut and glued the church design with a small wall around the, what is soon to be, graveyard. I used a water-based contact adhesive to fix the pieces together rather than PVA glue as it has a much reduced drying time.


To hid the joint of the foam board I cut 2cm strips and scored down the middle to get a neat fold in the middle and then simply glued them to the corners of the building. For the roof joint I increased the card width to 3cm but the scoring method was still used to get a neat fold. A cereal box would be a suitable thickness of card for this process.


The rear door is a thin, approximately 1mm, piece of balsa wood in an arched door shape. The windows I marked with a permanent marker. I was careful to cut out the windows in one piece. I then glue the removed piece back into place but indented into the hole to give the 3D effect of the windows.


The wall sections were joined using 5mm balsa wood to represent wood posts.


The grave stones were made from cuts of some bits of blue foam, again stuck in place using the contact adhesive.


In order to make the walls appear more 'stonelike' I used some more pieces of blue foam cut into thin strips and glued into place. I then used a strip of glass/sand paper to round the edges.


This I repeated on top of the grave yard walls.

The porch/main entrance way into the church consists of three layers of foam board, the outer most having the archway shape cut into it. A card outline was used to disguise the joins.

Using PVA glue, and my washed building sand mix, I added 'soil' to the graveyard and left to dry over night.


After the paint scheme was left to dry I then fixed some larger bits of rubble to mark the edge of the pathway to the gate entrance. The clay colour that I used on the roof made the church too 'toy town' in appearance so I repainted the roof parts with pomegranate red.


Almost done with some static grass and arches in the windows to make the church appearance more complete. I think that I will revisit the model and use static grass around the border to help it blend on to the table top. 

Thursday 13 December 2012

Firebelly - First Attempts at Source Lighting - Ogre Kingdoms

The fire belly from the Ogre Kingdom faction of Warhammer gives the painter an excellent opportunity to use object source lighting. This is a method of painting that gives the impression that part of the model is illuminating other parts of the model. In this case it is the fire issuing from the fire belly's mouth.


After painting the model I used the yellow wash from to highlight the areas where I felt the light from the fire would be most intense. The face plate and the belly plate, being metal, would give a good reflection of the fire. The top corner of the hammer and even the top edge of the sword all had the yellow wash treatment.


To indicate a harshness light source I exaggerated the creases in the skin of the ogre to imply shade away from the light.

Wednesday 12 December 2012

Bolt Action - Waffen-SS Grenadiers - Warlord Games

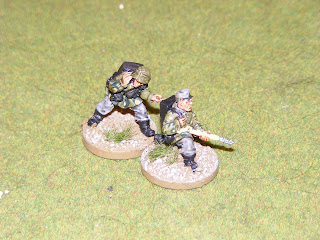
The Waffen-SS Box Set from Warlord Games gives you around 400 points. Enough to get your head around the rules. Due to the fact they were an elite force they are rated veteran in the book giving them a higher leadership and making the harder to kill.

In the painting I have tried to stick to something resembling the actual uniform rather than being an exact replica.  Trousers and caps in light grey with a black wash. The coats had a basic coat of green. On to this a dark green patch was applied and a spot of desert yellow in to the patch. All leather such as boots and belts I painted black.


Apparently the Germans used the same machine gun for both the light and medium machine guns. In the game the light machine gun is represented by a two man crew and the medium by a three man crew.


A medium mortar has a longer range than the light mortar but is unable to move and fire.


Radio operators are used to call in air strikes and arty.


 A small infantry unit with an NCO armed with an assault rifle, two sub-machine gun upgrades. 


A second infantry unit armed with rifles. Only the NCO has the upgrade in this unit but one soldier does have a panzerfaust.


A veteran medic helps keep nearby units alive.


Company commander with an optional upgrade 'body guard' runs across the battle field.


Tuesday 11 December 2012

Bolt Action - US Marine Corps Box Set - Warlord Games

Last week I popped my knee at work. This has had a major impact on my mobility but it does mean that I have had a bit of extra time for painting, being 'trapped' in a chair.

I have finished painting a couple of the box sets from Warlord Games for the Bolt Action rule set. The initial coat was army green from Army Painter's range of primers. The Straps, belts, and pouches I painted in khaki. Both of these I gave a wash coating of the camouflage green from GW. Cadian flesh followed by the flesh wash was applied to all the skin. Wood I painted in scorched brown and metal in gun metalic. Leather boots is dark flesh highlighted with leather brown. 

The bases are made up of a sand mix. This was painted graveyard earth and dry brush with the new Greybeard Grey again from GW.

The rules for Bolt Action are a bit vague about size of bases. I think that 25 mm is standard for single figures. In fact the new plastic miniatures come with 25 mm plastic bases. When it comes to larger bases for the weapons teams I used 60 mm for the US Marines and a mixture of 40 mm and 60 mm with the Waffen -SS. 


A light mortar crew. Two men that can move and fire with a 24 inch range. 


A Flame thrower team. Two men that can move and fire, short range but potentially devastating upon crews.


Medic and unit upgrade of a stretcher bearer. Heals wounded troops within 6 inches on the role of a 6. (Could have done with one of these when my knee popped!)


Radio operator that can be used to call in bombardments.


A small unit of Marines 1 NCO and four men. NCO has a sub-machine gun upgrade.


Second unit of Marines again NCO with a sub-machine gun upgrade and four other men. One man has a shotgun rather than the usual rifle.


MMG team or part of. I usually use the casualty marine as the third member of the team during games. Can't wait until I am back on my feet to play again.